What’s your kitchen drawer is more fun than what’s in your wallet at the moment.
Some leave them all empty but I like to stock my kitchen and peak in the drawers at times. I must confession that when I first got into miniatures that seems over the top but things changed over time AND I now get a kick out of knowing things are tucked away in cabinets and drawers of my kitchens.
Since they are so useful and add to the settings so easily, I decided they are perfect to share with you! I hope you find lots of places to put them or change them out to match the meal or even tuck them in a drawer or two. Enjoy! Please remember this is for your own use. They are not for resale.
Here is some examples of their use as props in displays besides filled the tea towel drawer….
Adding a warm touch to sharing a bite together.Never enough cake in my miniature world!Decking out the feast with linens and color.After any good meal there is good conversation while drying the dishes.
The kitchen towel for drying dish was stiffened with Aileene’s Stiffen Quik. For more on this step, refer to the hanky tutorial on my other blog.
Or for a photo shot of the many places to tuck a towel in place to add a splash of color and detail!
Along with the towels I thought I would highlight a few simple treasures from other artists that add detail in a kitchen that you might like……….
Outstanding crochet potholders by minigioSome wonderful breads by CspykersminiaturesUS on Esty
It is those little details that make you smile when setting up a scene. So put the kitchen towels to use in your kitchen and tuck a few in a drawer. It will make you smile knowing what’s in your drawer!
It has been a long, long lapse of time. I had such great plans for this year for gearing up with more postings. Unfortunately, the miniature mojo vanished and I became obsessed with hand piecing quilt blocks. It was a change of pace with fussy cutting and evening TV work this winter. It seemed a switch got turned off and I had no idea how to turn it on again – I just had to wait it out. Finally, the basement workroom isn’t so unattractive and it is beckoning again. I am still stitching but I can seem to lay it aside for a bit.
The fabric playing that kept my attention so long
It has been a topsy turvy year for us all and you just have to find something to escape to when it seems too much. Hobbies of all sorts are great for that. You can focus on doing something when all the big issues of daily life are getting overwhelming.
My kitchen vignette was to display some of my miniature foods I collect and make. Last year I made the barbecue dinner scene that I really, really liked -I just couldn’t seem to dismantle it and replace it with something else. So much for my planning!
The ever so good barbecue dinner!
Fast forward to now – I finally cleared my kitchen and now trying to plan what to serve next. So many good recipes….ummm!
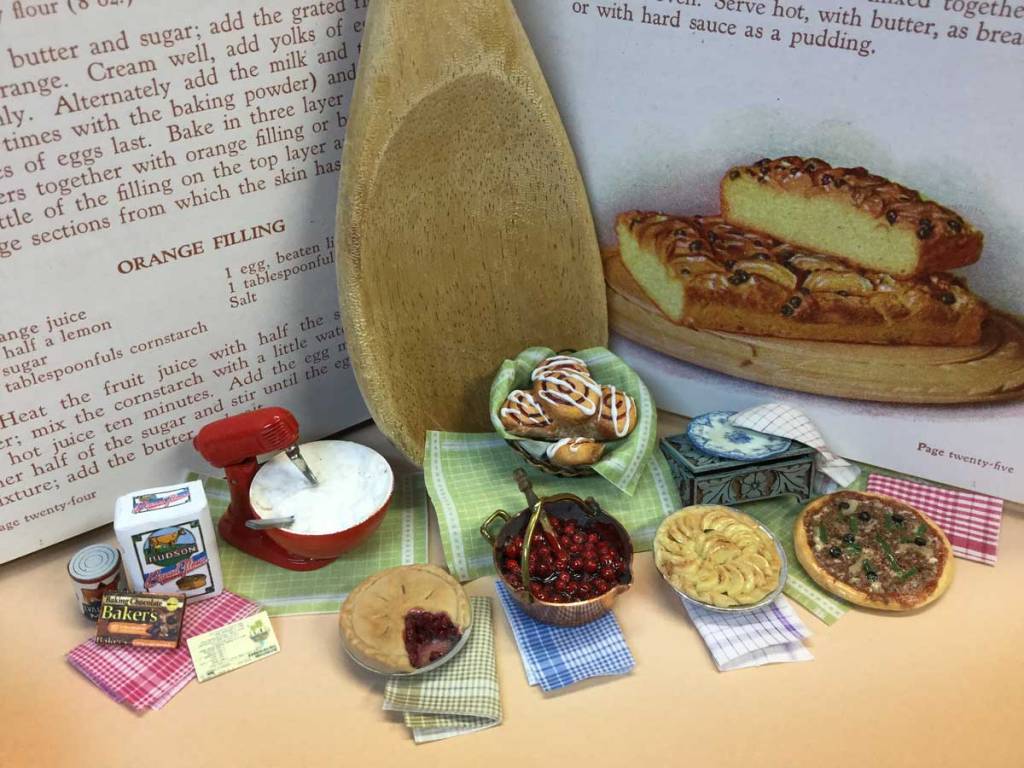
A stack of cookbooks with an open one to thumb through to find something to fix for supper. Thinking about food has made me hungry so time for tea and a nibble.
Browsing the cookbooks looking for inspiration!Details for tasty realism
I love this little open pastry with the oozy center. Sorry I don’t remember the maker but the detail is perfect! Sometimes it is the simplest thing is what grabs your attention and holds your focus.
I hope that has you curious to see what’s up in the kitchen! Check back soon!
Fall and caramel apples just go together! As the cool weather moved in, it got me in the mood to recreate this fall tradition in miniature.
I decided to share the process of this project so you could create it yourself if you wished. This makes a little vignette that is a complete story instead of just one food item. It does take some time but it doesn’t require a heavy skill level – apples are pretty much round balls with minor shaping.
I have to assume you have some basic tools for working with polymer clay – toaster oven, tiles, chalk, etc.. or this will get blogged down with getting you set up. A good resource for clear information is The Blue Bottle Tree . I found it very helpful and recommend it.
Parts of this project are polymer clay – the apples and the caramels. After these are created, the props are made – the melted caramels, the dipped apples, the open bag of caramels, and the wooden board to sit the hot pan on. This all pulls together to make a scene. Are you getting curious????….check out the details…………..
Creating the apples—-first the green ones…. below are the clay colors I used. The chunks show the approximate ratio of the mixture to get the green apple color. I am making more than the 3 needed for the project. Make as many as you want. Translucent is important to get that realistic (transparent) look instead of an opaque(flat) look to your food colors. An important thing to remember when you add translucent to the mix it will darken the color slightly after it is baked. So aim for an unbaked color a shade lighter than you think to account for that.
Clay colors and approximate ratio amounts
Roll out a “snake” a little thinner than a pencil thickness. I have an actual pea as a reference size to compare to. Figure out the length of your cut to get about that size and make the remaining cuts using the same measurement.
Shown below are three different possible tools to create the apple dimple. The rubber tipped stylus worked the best for me.
Add the stem. I used a piece of thread cover floral wire, painted brown. If you don’t have that – look for small plant stem from outside plants. Keep in mind these with be more breakable.
Floral wire cut into small piece to make an apple stem
Chalk colors I used. I used a damp brush to apply the chalk to the apples and a second brush to blend it in. Start with the yellow and build from there. The starting color is the heaviest applied with lesser amount of each of the other color as you progress down the line of colors.
Use a damp brush to apply the chalk.Ready to bake
Bake the apples at 230 F for 20 minutes. Some list a higher baking temperature but that is what I used.
When done baking but the apples are still attached to the tile, brush on a glossy water based varnish. Use a light coat only, if you make it heavy, they will have a plastic look. Set them aside for now.
Varnished apples
Now make the red apples……
Clay colors used for red appleMixed clay — mine is a little darker than I liked but I am using it. A lighted mix would be better for the chalks show up.rolling out the apple shapes
Make some thin sticks. I used a coffee stir stick but the wood is coarse. I tried a scrap of basswood later and it was much better.
Embed the stick in the apples. You will need at least 3. The apples bottom out when the stick is pushed in. You will need to reshape it slightly. Make the apple a little narrower at the bottom.
Reshape the apple bottom to be more narrow than the top
Apply the chalks. Since my apple were so dark the colors and blending is not going to show up as well. However, the apples will be coated with caramel sauce so I only need one apple to have half exposed in the pan of melted caramel.
Blended and ready to bake with a few of my better ones on the left. The ones on the right will be completely covered in caramel.
Bake and set aside…….
Making the caramel candies………
Translucent, ochre and small amt of brownYou can always add more of the darker color than correct a too dark mixthe mix after add the second sliver of brown
Roll out the clay and trim off the edges. Use a thin blade to make the rows and then the columns as shown. You can add a little cornstarch to the knife if sticking and lifting the cuts.
Bake the caramels. Apply varnish afterwards.
Rewarm for a few moment to cut the clay. If you cut the clay while warm, the cuts are smoother and you do not get the white cut line in the clay.
Now all the oven cooked clay is DONE. The following parts are NEVER put in the oven. This part is using paints and getting a transparent/translucent look. Just by itself acrylic paints are opaque and will not do the job as is, so they have to be doctored to work. The two key things are the Scribbles paint and the Diamond Glaze – these are the two critical paints/mediums to get the look. Both have a dimensional element to them so color is FLOATING in the medium to get that oily look of melted caramels.
This made the perfect color and transparent look I was aiming for.
Since I am using the toaster oven, I use the top with a couple of layers of extra tiles as a buffer to increase the drying time with the warm surface. I would not put it directly on the top of the toaster oven without the tiles — too hot and possible fire hazard. If you can’t find the right mediums – experiment mixing things on palette paper and seeing what they look like dried. I tried mod podge (on the left) . It had little bubbles when dry and wasn’t a crisp color. There are some mediums to add dimension in the acrylic paint tube section that might possible work. A gloss gel (has transparency) or acrylic glass paint (has transparency) are workable possibilities. Again, try mixing to get your color and what is looks like dried before using on the apples.
Testing various combinations. Using the tile as a buffer.An inexpensive pan and also plastic so sauce can not be cured in the oven or it would melt the pan.
The sauce has to have two difference thicknesses. One is thinner to dip and cover the apples. It has to have the drape of actual melted caramel. This is easy enough since the paint/mediums are water based. I used a pipette to add a drop or so water to some of the mixture (consistency of heavy cream) in an cap of old lip balm. This is small enough to dip the apples without using tons of paint and will be tossed afterwards. The remaining mixture on the palette paper is thicker ( similar to consistency of sour cream), this is needed to go in the pan and have the apple half covered. If it was runny the apple would sink or tilt before it sets up. That is why we need to different thicknesses.
Added a few drops of water to get it more runny to dip apples in.
Now how to get the thick sauce in the pan???……….. a plastic bag sealed with a tiny nip in one of the corners and squeeze it into the pan without a lot of mess.
Not so hard!
Now dip the apples in the runny sauce and set on parchment paper (from the real kitchen) or tracing paper to dry. Also set the best apple in the sauce pan. Both of these are then set on top of the toaster oven on the tiles. This could be get left to sit on the workbench overnight but I like a faster finishing time. If you have a spoon available, spoon a little sauce in it and sit it with the other items to cure/dry.
Set aside to cure. A faster curing with the warm heat. I also put the dipped apples here, just not seen in this photo.
Now this is curing you can make a base board and a hot pot board. I used wood scraps and sanded the edges and rounded the corners for a nice look. I had oil paint on hand ( I wouldn’t just go buy them for this project) to create the faux striped wood look. You could just use a darker solid color board but I like the added interest. Since this is oil paints, it needed a couple hours at least drying time.
Make several so you have various sizes to play with.Colors and medium I used.
If you didn’t want to faux color the board with oils, play with acrylics or just make it a solid color. If you have lots of scraps, just play around to get the look you want. Perhaps add a draped towel to the gathering?
Now to make the open bag of caramels. It took some time but I finely figured out a way ! The magic of double stick tape! It comes in handy times and really works to this project.
Hopefully the visual aid will get you there!
Okay, you need THE LABEL ….Below is the pdf file of the label to print and use.
Make sure all the parts are cured and then comes the fun play — assembling it together and watching it come a captured moment!
This is an inexpensive project with the proper supplies. If you have made one and figured out the kinks – make another one with your children or grandkids. They will treasure the afternoon spent together.
Of course – finish up with clean hands and head to the kitchen to make the real deal with actual apples and caramels. YUM!!!
Please note this is a project to enjoy – not to make copies to sale….
I haven’t added much to the food blog yet as you can see. I had to figure out a writing style to present things – not just a picture of a great food item. So I decided I needed a stage – hence the current project for displaying them. Things are always simple and quick in your mind but so much more involved in actual time. Also, I work S-L-O-W. It does work out for the best in the long run because over time my realism gets fine tuned with more detail.
Collecting foods is enjoyable but the REAL fun is putting them in a setting that creates a story – an added layer of my enjoyment.
Another objective was to point out that you do not have to have a large dollhouse – a small setting can be very versatile and it is amazing how much detail you can put into it.
I wanted a kitchen and a dining area with both areas well visible but separate. So sometimes both can be set up or just the one area depending on the occasion.
So enough introduction…….
Fine dining doesn’t have to be elaborate. How about a beet salad with a dressing drizzled over it followed by soup and bread? Sounds perfect to me!
A beet salad with a drizzled dressing for tonight’s supper.
The colors in the salad complimented the red wine in the glasses. It seems they were made for each other. The salad plates are by Orsolya Skulteti of Orsis Minis. I got them this spring at the Chicago International show. She also has an Esty site if it is not possible to make it to a show. The soup tureen is by Jane Graber. Her redwork pottery always adds a warm touch. The pumpkin autumn tray was made by MoonBijoux , an Italian food artist on Esty.
I was going to have the room unoccupied but a Jeanne Rullie’s doll fit so well as the proud hostess that she had to stay. She seems glancing at everything for the final check before the guest arrive. Her hand fit the knob of the chair and added a life like gesture that I hadn’t planned on but was perfect for the moment.
The final check of the dining room before the guest arrives. The soft smile of contentment when everything is ready. The casual hand resting on the chair was perfect.
The table and chairs are by R.L. Carlisle. His work has stood the test of time and still look fantastic years later. They were made in the mid 70’s.
The table is set!
The corner hutch was a painted Bespaq hutch piece that seemed dated but I liked the size and shape. So I removed the doors and revamped it to fit my era. I am aiming for a 40-50’s setting.
It now houses some great china painted pieces that have a final home. I also added in with some of my own faux painted Chrysnbon dishes to fill it out and add to the color palette. Nancy Wantiez made the basket and I filled it with a lush philodendron from my friend Loretta Kasza.
I was loosely aiming for the 40-50’s era so I thought a print of The Gleaners was a must. The food bowl is by a UK artist from 25+ years ago and still holds it colors well. The urn by Vince Stapleton seemed a good choice for the time frame. Of course, the 40s and 50s were big into doilies – so naturally I used them freely ( I don’t need much excuse – I love them anytime!). The clock is by Ron Chase. I never have a hard time finding a spot for one of his. I had made the National Geography magazines for another project a few years ago and made plenty so added them and the reading glasses to set on the stack.
Creating the mood of the era.
Time to skip down to the kitchen…
I had to have an old style refrigerator. I got brave and drilled a hole to add a light! It was worth the effort! Not entirely sure if they were lite back then but I am pretending so. I stocked a few items inside and even found an ice tray in my pile of metal minis.
The refrigerator is well lighted and stocked.
The stove is a classic of the era. This is a kit from Phoenix Models in the UK. You will find a finished one occasionally on Ebay but rather pricey. The kit is a cheaper way to go but I will warn you it is not an easy build – the instructions require multiple rereads and patience to assemble. However, the end results speak for themselves. I think I might do some photos of the constructions in a posting some time down the line when I build another one to help fellow builders.
The finished stove ready for my kitchen. Putting the oven to use! Pot roast cooling and rolls warm from the oven.
My display in the kitchen is not in line with the upstairs dining as you can see but I was in the “cooking ” mood so allow me a little artistic license today!
The roast is out of the oven and rolls are about ready. I got the meat fork this summer at a miniature shop during a trip. A vintage piece from the past. It added such detail along with the crochet potholder to the scene.
The apple strudel prep board is by Betsy Niederer. It could be sitting by itself under a dome since it creates a stand alone setting but I put it to use in my kitchen today. I am imagining the smell of cinnamon in the kitchen mingling with the roast and fresh rolls. The meal is coming together. The cherries and peaches are by Jan Patrie. I am not sure what the cook had intended but I loved the color – so why not!
Apple Strudel prep board
I had intended to build a kitchen sink cabinet but dreaded the hinging of doors so rethought that idea. My placement of one in the mock up is borrowed from another kitchen. The large porcelain sink was a better fit for the time (and no hinging needed!). I will probably add a skirt to it later.
The kitchen mockup The porcelain sink was the final choice.
I laser etched the door window to add some interest and make it inviting.
The frosted etching adds some privacy.
Stocking the pantry was fun. I am not sure the brands and packaging are totally accurate but I enjoyed the arranging. The unfinished cabinet is by M & R miniatures. I painted it and added worn spots and shelf liners to give it the feel of well used kitchen storage.
A well stocked pantry Everything for making a fine meal.
In playing around with things, another Jeanne Rullie’s doll invited himself into the scene. It made a perfect shot with the porch light on and the door halfway open – he looked so ready to step into the kitchen.
He is looking forward to the evening meal invite. The dinner guest and perfect gentleman.
A view of the kitchen….
Wonderful food and aroma greet the guest. The bustling activity in the kitchen.
Now so you can see the humble start of my kitchen and dining room box…..
The beginning shell. Playing house with arranging things. Finally, a warm and inviting home.
It has come quite a way from my bare beginnings but I have a feeling it will be hosting many a fine meal in the future.
Whether you linger in the dining room or in the kitchen, the food is ready. It is time for a great meal and good company!
Mouth watering ribs with side dishes! Grab a plate!
This scene is a combination of factors.
March has the big 12 college basketball finals in Kansas City. The evening news has been highlighting the event and mentioned how the finals and barbecue (something that Kansas City is famous for) have grown together when people come from out of town for the event. We live about 2 hours away from there.
About a year ago I got the ribs from Diane O’ Neill ( Dollshousefood). They were the most believable ribs that I had seen in miniature. I couldn’t get over the detail whenever I looked at them or pulled them out to show someone when they were visiting and looking at my miniatures.
So it got my wheels turning for a big rib dinner in my kitchen. I like to collect my family’s food favorites beside pretty desserts.
The ribs hot from the oven and has the last coat of sauce!
My husband is a big barbecue fan and KC masterpiece is our favorite sauce. I experimented to make a pastry brush and bowl of sauce so it looks like the ribs are fresh from the oven and just had the last coat of sauce. Naturally, baked beans accompany the ribs. The beans are by Betty Accola. The slice of bacon on the top is perfect! Also, a nice tossed salad and dressing to fill out the meal. Getting hungry yet?
Of course, on the back counter is a tasty angel food cake with berries – IF there is any room for dessert after this hearty meal!
This blog is to share the artistry of food in miniature. I have been drawn to tiny plates of food for a long time. So here I get to visually share my foods that I have collected and occasional make (mine are less elaborate due to limits of my skill but still I have FUN).
My tiny foods have given me many hours of pleasure and I wish to share my enthusiasm for this hobby. I have been involved with miniatures for many years I want to share some of the tricks and tips that I have learned along the way. There are less miniature shops now days and you may be far away from a club or show so through the blog the distance is shortened to this tiny kitchen table. I hope you be inspired or curious enough to dabble!
So many things can be shared while sitting together enjoying a slice of cake and a cup of tea.
So please, step into my miniature world…..
Would you care for a slice of cake?
The mold, first layer of color and a finished bundt cake
The cake isn’t particularly fancy but it is from a class I took years ago. We made several from the mold and iced them. This one remained unfrosted but I like its color and the transformation from clay to cake. I am rather fond of poppy seed cake so it is still a favorite of mine.
Elegant China
The china is Chyrsnbon plastic dishes transformed by True to Scale decals. I love the delicate pattern of this design.
Water decals to dress up the dishes
Here is the wall shelf with the larger plates and an another faux china plate. If you wish to make some faux china, check out the tutorial on my other blog. It helps when you need something for wall or shelf.
Inexpensive china that looks great!
The teapot with the knitted cozy keeps the tea warm for a refill is created by Helen Palenski of New Zealand. She knits a wide array of toys besides the cozies.
Hand knitted tea cozy
The hutch offers a wealth of area to display cooking items. Canisters, recipe box, mixing bowls, paper towel holder, etc.
A suggestion of kitchen in use with the various cooking items.
Add a picture to the wall, a houseplant, a rug under the table….and it begins to look like a cozy kitchen without having a dollhouse or entire kitchen roombox.
A good view of the room
Now pulling further out to see the entire structure…….two walls, a floor and ceiling ( off for the moment) and removed for photos is a plexiglass cover to keep it protected. This is a way to have a small slice of detail to add to as you make or collect that is manageable but still capable of having quite a lot of detail. Not so many decisions on colors, furniture, etc. to overwhelm you but simply allows you to PLAY!
Speaking of play…
Here is a simple paper towel holder to make for a kitchen. I had a round wood piece for the base. A button could be used if that is more accessible.
Paper towel holder to make
Tiny Turning cut and end sanded to remove point
The upright rod is from a tiny turning piece cut with the tip sanded to make it a rounded knob. Glue it to the base. Stain or paint as you like.
The tube is a piece of a straw. My straw had too big of a diameter, so I sliced it and taped it back together to make it smaller and in scale. Clear is better, the yellow is shown for better photos. I used a cut piece from a napkin that had texture to make the paper towels. Glue it and roll it up on the tube. Leave a little tail loose. This is very simple and inexpensive…….but looks pretty darn cute!


 This is a way to have a small slice of detail to add to as you make or collect that is manageable but still capable of having quite a lot of detail. Not so many decisions on colors, furniture, etc. to overwhelm you but simply allows you to PLAY!


